
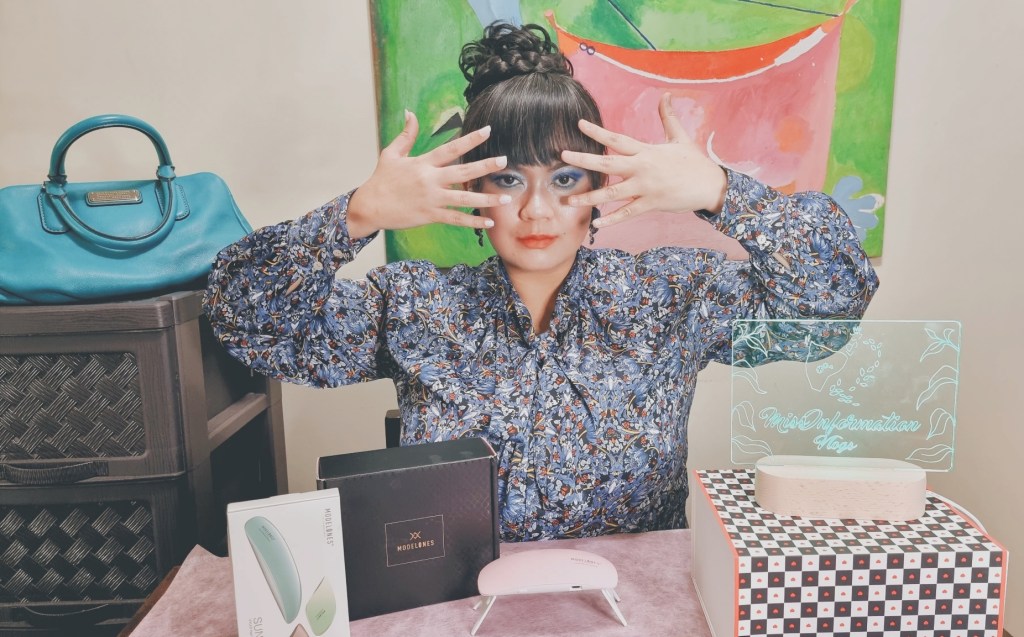
The kit is lightweight but it is filled with tons of products I need to make my own poly gel nail.
Package Includes:
– 2 Poly Nail Gel (1oz)
– 1 Mini Nail Lamp 6W
– 1 Slip Solution (15ml)
– 1 Base Coat (10ml)
– 1 Top Coat (10ml)
– 1 Nail 100/180 File
– 1 Poly Nail Brush and Spatula
– 24 Straight Dual Forms(12Sizes*2pcs Each)
– 24 Curved Dual Forms(12Sizes*2pcs Each)
– Glitters
– 1 Instruction Manual
I really have no idea what poly gel nail is. I said yes to Modelones without knowing how poly gel nail works. Good thing they sent me EVERYTHING I need to create my own poly gel nails. 💅

If you zoom in to my cover photo (first photo above), you’ll notice how small and baby-like my real nails are. Compare them with my Modelones poly gel nails..
Poly gel nail is a combined strength of acrylic’s durability and the elasticity of LED hard gels. It is lightweight and more flexible, less prone to chipping. The best part? It doesn’t have any bad scent unlike the nail polish or acrylic.
It looks overwhelming at first but it is very easy to use (coming from someone who doesn’t wear a nail polish all throughout these years). Oh sorry! You saw me with beautiful nails before? 🙈 I don’t know how to say it but…

To prove to you that Poly Gel Nail application is easy.. let me share with you my video tutorial for this kit.
But for those of you who’d rather read the step by step instructions.. I’m still up for it! 😉
1. Buff your nails with a buffer block. On the video, I applied nail cream on my nails to avoid nail damage. Lo and behold, it was wrong all along! Nails should be rough, not smooth, for this procedure ✌🤦♀️
Tip : Gently remove all loose cuticles off the nail surface. I skipped this step. I don’t intend to wear the poly gel nails for too long so I intentionally did not remove my cuticles.
2. Set aside the NAIL FORMS you need for each finger. Memorize the nail form numbers. For those who have smaller nails, please choose a form that is just the right size for you (not bigger like what the others say, at least for me 😏).
3. Apply the base coat and cure it for 60 seconds under the UV lamp (apply sunscreen and cover your fingers before putting them under the lamp)
4. Using the spatula, apply the polygel to the nail form (add glitters if you want) but make sure that the glitters are in front of the form and not at the back (where it’s not seen)
5. Use the brush side of the tool to get glitters and put them under the gel (front side of the form).
Tip : The gel is gooey. Avoid scattering the gel all over the brush and nail form. If this happens, clean them before using them again to avoid mess.
6. Apply the slip solution using the brush (not too much) on the gel and make sure it is easily absorbed by the gel before you stop blending. The more wet or runny it is, the weaker the nail is going to be. The more solution you add, the less pigment you’ll see on your poly gel nail. Avoid putting a lot of the slip solution.
Tip : Dip the brush in the slip solution to brush off any excess gel on the edges of the nail form
7. Gently put the nail form on top of your fingernail (do not pinch it). With the “wet and sticky” nail form on top of your nails, slowly put your finger under the UV lamp (make sure you applied sunscreen beforehand and you have a cover for your hands before you cure your nails).
8. Cure the front nails for 60 seconds and the underside for 30 seconds.
Tip : Poly gel nails last for 2 to 4 weeks depending on the kind of lifestyle you have and the amount of work your hands do everyday
9. Wiggle the nail form to remove it until you hear the satisfying sound + see the gel-like beautiful nail in front of you. File/cut the nail GENTLY.
Tip : To avoid poly gel nail breakage, avoid bending the poly gel nail while filing. To easily remove the poly gel nail, just file it gently (make sure you’re not filing your own nail) and gently bend the nail.
10. Apply the top coat on all your nails and cure them one last time.
Tip : Visit Modelones and choose the best nail enhancement product/kit for you. They have a WIDE VARIETY of color, texture, and designs. Go gaga and check out their promos / giveaways once in awhile. 🤗
11. Apply your favorite nail serum/cream to nourish the cuticles and protect the nails.
Tip : To change your nail colour/design, you can also add your favorite nail polish on top of the poly gel nails. Just cure the nail polish after every application.
We tend to think that our nails define us. It’s either you’re hardworking and busy OR spoiled and always on the go. It doesn’t mean we’re busy (staying at home), our nails should be boring and dull. We can still own our nails and live life fully with nails that say, “I’m hot and you know it! 😉”
Do you happen to struggle lately? A new hobby like this will keep you busy and will give you the perfect distraction from this crazy world we’re in. 🙀 I know for I myself have anxiety lately. 🥺
I know you busy moms can relate with me when I say, “Shorter nails are the only way to go..” but no! Modelones gave me a new reason to love my nails.. my hands in particular. We can still have short nails but we can also make them pretty, styled and well-moisturized. 🧤 Then have hands that defy aging.

Now is the best time to take extra care of ourselves. May it be through pampering or beautifying ourselves, enriching our mind and soul or learning a new skill. I wish you ALL the best in this world! At the end of the day, just remember.. “You got this babe!”
